A Practical Guide to Data Models and Dynamic Content in Builder.io
After writing about building my site with Builder.io, I realized I only scratched the surface on data models. While I mentioned using them for projects and blog posts, I didn't dive into the actual setup process or the challenges I ran into along the way.
Since data models are one of Builder's most powerful features — and honestly, one of the less intuitive ones if you're coming from a pure design background — I thought it was worth a deeper look. This is the guide I wish I'd had when I started.
Why Data Models Matter
Before jumping into the how-to, let's talk about why you'd want to use data models at all.
When I first started building pages in Builder, I was creating each project page individually. Each one was a unique snowflake — manually placing images, typing in descriptions, tweaking layouts. It worked fine for a few pages, but I quickly realized this approach had some serious limitations:
- Consistency was hard to maintain — each page looked slightly different
- Updates were a nightmare — want to change the layout? Good luck doing it 15 times
- Scaling felt impossible — adding new projects meant starting from scratch each time
Data models solve this by separating your content structure from your visual design. You define what fields each piece of content needs once, then create templates that can be reused for any number of entries.
Setting Up Your First Data Model
The core process is straightforward: define your content structure, create entries with your actual content, then build templates that pull from those entries. But the strategy behind how you structure your fields makes all the difference.
Creating a Data Model:
- In your Builder.io dashboard, go to the Models tab
- Click "New Model"
- Give it a name (like "Projects" or "Blog Posts")
- Add your fields using the "+ Add Field" button
- For each field, choose the appropriate type (Text, Long Text, Image, etc.)
I ended up using two different approaches that taught me different things about how Builder handles content.
Projects: Structured Sections
For projects, I knew exactly what information I wanted to display and where it should appear on each page. This led to a multi-field approach:
Fields I Added:
- Title (text)
- Short description (text)
- Main image (image)
- Services (list)
- Tools (list)
- Goal (long text)
- Process (long text)
- Results (long text)
- Gallery images (multiple images)
The key insight was thinking about page sections. Each field maps to a specific part of my project template - the short description and main image work perfectly for overview cards, while goal, process, and results each get their own dedicated sections on the detail pages.
This approach gives you maximum control over layout and ensures consistency. Every project follows the same structure, but you can style each section differently and control exactly where each piece of content appears.
Blogs: Rich Content + Structured Metadata
For blog posts, I initially took a hybrid approach, but eventually moved to a more systematic method using rich text fields:
Fields I Added:
- Title (text)
- Publish date (date)
- Excerpt (text)
- Feature image (image)
- Tags (tags)
- Body (rich text/HTML)
The game-changer here was the rich text field for the main content. Unlike the project approach where I split content into specific sections, this lets me write freely while still maintaining the systematic benefits of data models.
Not able to add images in your richt text editor? By default, Builder's rich text editor doesn't allow images. You need to enable this in Settings → Advanced Settings → Editor → toggle "Allow images in rich text editor." Once enabled, you can add images directly within your blog content, just like any other rich text editor.
Custom Styling for Rich Content: Since rich text fields output basic HTML, you'll likely want to add custom CSS to style headings, paragraphs and images.
To add custom CSS:
- In your page editor, go into the "Data" tab
- Open the 'Code' Accordion
- Click the 'Edit Content JS + CSS' button
- Add your CSS (Target elements like h2 for headings, p for paraagraphs or img for images)
Creating the Template
The template creation process is the same for both approaches:
- Create a new page that will serve as your template
- Build your layout using Builder's visual editor
- Add a data source under Connect Data, select the correct blog or project entry
- Click on text elements or images and add a New Data Binding under 'Element data bindings'
- Select the field from your data model (like {{title}} or {{body}})
Then next time when adding a new blog or project, simply duplicate this page and change the data source to the specific entry. The page will automatically populate with that entry's content.
Building Overview Pages: The Query Discovery
Okay great, so now I had my data models set up with all my project and blog entries. But how do I actually display them on overview pages? This is where things got interesting. My first instinct was to create overview pages with cards and manually connect each card to a specific data entry. It worked, but felt clunky.
Then I discovered Builder's query feature, and everything clicked.
The Manual Way (Don't Do This)
Initially, I was creating a card component, connecting it to "Project Entry 1," duplicating it, connecting the duplicate to "Project Entry 2," and so on. Functional, but painful to maintain.
The Query Way (Much Better)
Builder lets you query your data model and automatically generate components for each entry. Here's the actual workflow:
Create your card design
- Build how you want a single project/blog post to look on your overview page
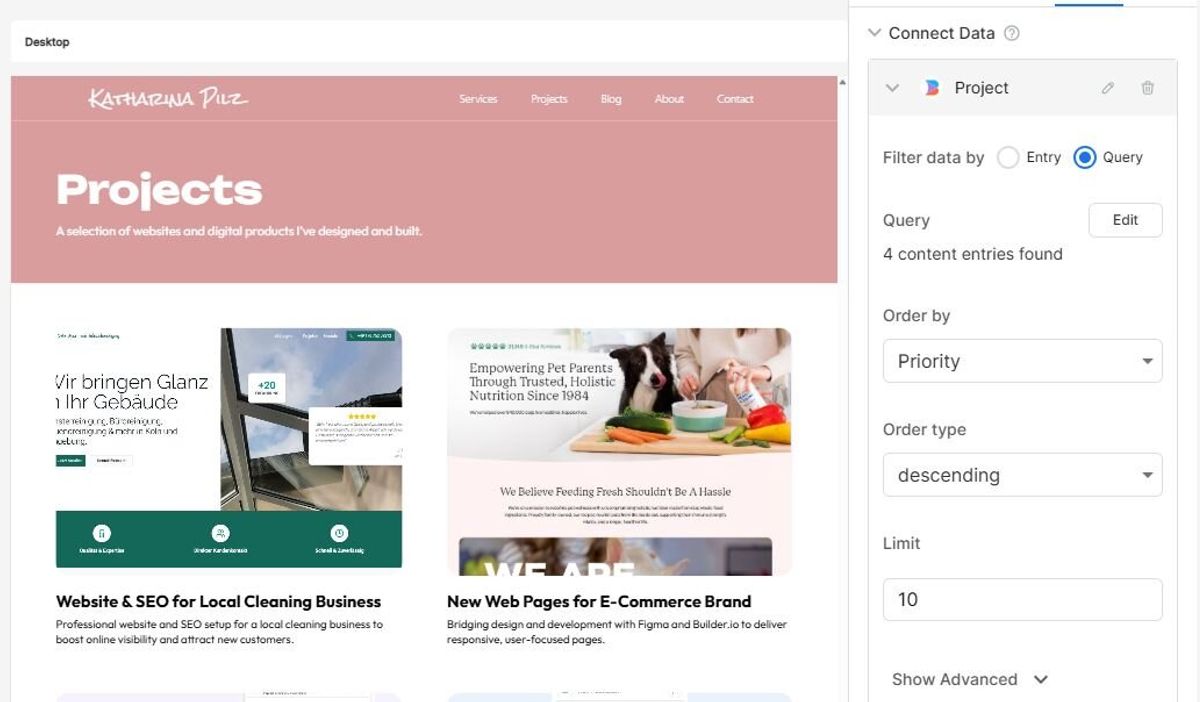
- Choose "Query" instead of "Entry" (this pulls all entries instead of just one)
- Set your ordering - for blogs, you might order by "Publish date" in "descending" order to show newest first
Connect the data & Set up the repetition
- In the "Connect Data" panel, select your data model (like "Blog")
- Select your card component
- Go to "Element data bindings"
- Under "Repeat for each" select "Results"
- Refresh Builder's preview (important - you might not see changes otherwise)
Connect individual elements
- Select each item in your card (title, image, excerpt, etc.)
- Add element binding for each one
- Select the respective field (like "Results Item › Data › Title")
- Builder will automatically apply this to all entries
Tada! Each card now displays different content from your data entries. Add a new project to your data model, and it automatically appears on your overview page.
The Tags Challenge: When Things Get Nested
This worked perfectly for my projects overview. But when I tried to do the same thing for my blog overview, I wanted to show tags for each post - and that's where things got tricky...
The Problem
For my blog overview, I wanted to display tags for each post. Sounds simple, right? Not quite.
When you're already inside a data query (iterating through blog posts), trying to iterate through tags within each post creates a nested iteration. Builder's visual interface doesn't handle this elegantly — the tags field just wouldn't show up in the data binding options.
The Solution
I had to get a bit creative and look at how Builder actually references data in the code. When you inspect a data binding, you'll see references like state.resultsItem.data.title.
Here's exactly how to set up tags within a data query:
Add the tags container
- In your blog card (within the repeating section), add another box for your tags
- Style it like you want it, I used badges (container with text in it)
Set up nested repetition
- Select your tags container
- Go to "Element data bindings"
- Under "Repeat for each" instead of selecting from the dropdown, enter: state.resultsItem.data.tags (assuming your tags field is called "tags")
- Connect the text element to the indivitual tag by entering state.tagsItem in the element data binding field
This creates a tag for each item in your tags array, nested within each blog post card. It's not the most intuitive workflow, but once you understand the state.resultsItem.data.fieldName pattern, you can access any nested data.
Workflow Tips I Learned the Hard Way
Refresh, Refresh, Refresh
Builder's preview can be finicky with data models. If you're not seeing your data entries populate, try refreshing the preview before assuming something's broken. I spent way too much time "fixing" things that were already working correctly.
Think in Systems
Coming from designing individual pages, the mental shift to thinking in templates took some adjustment. But once you start thinking about the structure of your content separate from its presentation, everything becomes more scalable.
Start Simple, Then Iterate
Don't try to build the perfect data model from day one. I started with basic fields and added complexity as I needed it. It's much easier to add fields later than to restructure everything.
When to Use Data Models vs. Custom Pages
Not everything needs to be a data model. Here's how I think about it:
Use data models when:
- You have multiple pieces of content with similar structure
- You want easy content management
- You're planning to scale (more projects, more blog posts)
- You want consistent presentation across items
Build custom pages when:
- It's truly one-off content (like an About page)
- You need very specific, unique layouts
- The content doesn't fit a repeatable pattern
The Real Payoff
Now that I have this system set up, adding new projects or blog posts is incredibly smooth. I fill out the fields in the data model, and the content automatically appears on my overview pages with consistent styling.
It's also made collaboration easier. If I need to update project information, I can do it directly in the data model without touching any design elements. And if I want to change how all project cards look, I just update the template.
What I'd Do Differently Next Time
Looking back, there are a few things I'd approach differently:
Start with the data structure first. I designed the pages and then figured out the data model. Next time, I'd spend more time upfront thinking about content structure.
Be more strategic about field types. Some of my text fields could have been dropdowns or structured differently to make content entry easier.
Plan for relationships. Right now, each data model is independent. But I can see cases where you might want to link projects to blog posts, or blog posts to authors.
Is It Worth the Learning Curve?
Honestly? Yes. The initial setup takes some time, and there are definitely moments where you'll need to think more like a developer than a designer. But the payoff in terms of maintainability and scalability is huge.
If you're building anything more than a simple brochure site, taking the time to understand Builder's data models will save you hours down the road. And once you get comfortable with the concept, you'll start seeing opportunities to systematize content everywhere.
The key is starting simple and building up complexity as you need it. Don't let the initial learning curve scare you off — it's worth pushing through those first few confusing moments with nested iterations and data bindings.